Saturday, April 14, 2012

Photo Letter Blocks


I saw these photo message blocks over at the Stories by Me! blog on Pinterest, and thought what a wonderful surprise they would be for my Best Buddy who lives out of state. The poor girl ends up with all my craft attempts. This one, however, turned out pretty slick, even if my photos don't do them any justice. (Maybe she'll take a photo of them for me in their natural setting and share it.)


Pinspiration: Letter Blocks

What I used: 
  • 3 to 6 blocks depending on your word(s). I found blocks measuring about 1.5 inches, but these are a little small.
  • 3 - 4 coordinating scrapbook papers to match your theme
  • ModPodge Matte Decoupage Glue - (Or make your own)
  • Laser Printer - Inkjet colors will smear if they get wet! Most home printers are Inkjet.
  • Scissors
  • Foam Brush
  • Sandpaper/Sanding Block
  • 9 to 18 photos formatted to fit your blocks. 
  • Photo editing software, such as Adobe® PhotoShop® (Gimp a downloadable program or Pixlr, an online photo editing program would work as well)
Optional:
  • Finishing Spray
  • Distress Ink or Chalk
  • Letter Stencils
  • Acrylic Paint

How To:
  1. GET ORGANIZED. Figure out what you want to spell. I wanted to have two words on opposite sides of the blocks. I chose F-A-M-I-L-Y and F-R-I-E-N-D. Then I picked out some bright and summery colored paper that I knew my friend would like. Then I sorted through a bunch of photos to narrow down which ones I thought were worthy.

  2. I used PhotoShop to re-size my images to what I needed and printed mine in black and white on the laser printer. You could use real photos though, printed from a photo lab.

  3. I printed my letters out onto scrapbook paper that I had to trim to 8.5"x11" in order to run through the printer. Another option could be to paint or stencil your letters on to the paper. You could also cut your letters out and glue just the letters on your blocks like this example from Berlin Patch.

  4. Trim all your images and letters to fit whatever size of blocks you have.

  5. Paint a coat of ModPodge on the cut ends of your blocks, as they will soak up and absorb more of the glue than the other sides. Let this dry before continuing.

  6. Paint a thin layer of glue to the first side of one block. Place your first photo or letter square over glue and press in to place, removing any air bubbles or crookedness. While the glue is drying, continue to repeat the process for your other blocks and squares of paper. Try your best to WAIT for the glue to dry before trimming or sanding any excess paper.

  7. Once the glue is dry, sand the EDGES of each block and avoiding scratching the photos or letters. Optional: If you want an aged or distressed look, rub ink or chalk along the sides of the sanded portions of the blocks. The idea is to darken the exposed wood and disguise any white paper edges. (I chose not to do a distressed look.)

  8. To protect the photos, spray a few layers of finishing Acrylic paint or a few more coats of ModPodge.

Saturday, April 7, 2012

Peppermint Meltaways


These cookies are a HIT among the women I know. Men like them, but not NEARLY as much for some reason. DISCLAIMER: If you read the ingredients of these marvelous cookies, you'll see that they are mostly butter and flour. So don't be surprised when a serving size is probably only two cookies. These are almost pure fat... with that said, who freaking cares?! They are awesome!

One more thing before you start. These cookies WILL NOT TURN OUT IF YOU DON'T USE REAL BUTTER. Duh. Some of you might think this is a no brainer, but in my early experiences with this recipe, I discovered this the hard way. If you are able to get them to taste the same using margarine, let me know what portions you used.

Prep Time: 45 min.
Chill Time: 30-60 minutes
Bake Time: 12 minutes
Makes 3.5 - 4 dozen cookies

Nutrition per serving (ONE cookie):
Calories: 83
Fat: 5g
Cholesterol: 10mg
Carbs: 10g
Fiber: 0g
Protein: 0g
Sugar: 6g
Sodium: 45mg


Cookie Ingredients:
1 cup butter, softened
1/2 cup powdered sugar
1/2 teaspoon peppermint extract
1 1/4 cups all-purpose flour
1/2 cup Cornstarch

Glaze Ingredients:
1 1/2 cups powdered sugar
2 tablespoons butter, softened
1 to 2 tablespoons milk
1/4 teaspoon peppermint extract
2 to 3 drops red food color, if desired
Candy canes or hard peppermint candy, crushed

Preparation:

1. Combine: Butter, powdered sugar and the peppermint extract in large bowl. (If you use a metal bowl it will cool the dough much quicker.) Beat together at medium speed to cream the butter with the sugar, scraping bowl frequently. Reduce mixer speed to low; add your flour and cornstarch. Beat until mixed together well. Cover and refrigerate until dough is firm (30 to 60 minutes).

2. Heat: oven to 350°F.

3. Shape: Rounded teaspoonfuls of dough into 1-inch balls. (This is smaller than you think. I usually end up going back and pinching a little off of the cookies to make them smaller.) Place 1-1.5 inches apart onto ungreased cookie sheet. (plenty of butter in these so they shouldn't stick.) Also, I flatten mine with the heel of my hand a little so they don't puff as much... I guess this is a personal preference. but the icing stays on better I think.

4. Bake for 12 to 15 minutes or until edges are lightly browned (the rest of the cookie will still look very light. Let stand 1 minute then remove from cookie sheet to cool completely.

5. LET THEM COOL. (Sometimes it's hard for me to wait, but icing these buggers will be much easier if they are cooler.)

6. Drizzle: glaze over cooled cookies. To make the glaze, combine 1 1/2 cups powdered sugar, 2 tablespoons butter, 1/4 teaspoon peppermint extract and enough milk for desired glazing consistency in small bowl OR like I did, in a baggy, and mix by squishing the bag. If you mix it in a baggy, you can just cut the corner and drizzle using the bag like a piping bag and have one less bowl to clean! Add in food color, if desired. Immediately sprinkle with crushed candy.


Recipe Variation: Try using Almond extract instead of Peppermint, or maybe Lemon or Orange. This cookies is a good base for trying different flavored extracts.

Thursday, April 5, 2012

Mini Polaroid Magnets


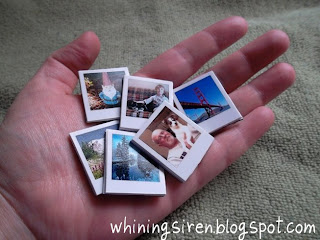
I stumbled on a cute little magnet project from the Ambrosia Creative website for custom Polaroid shaped magnets. I decided I wanted to make them for my best friend who lives a couple states away. But after seeing how cute they were, I decided I wanted a set for myself as well. Here is how mine turned out and how I did it.

Pinspiration: Tiny Polaroid Magnets

Some of the items are a little difficult to find on the Harbor so I also included where I found them below.

You will need:
  • Stiff white card stock or photo matte board (I used the same board as is used to Matte a nice photo, because it had the right thickness I wanted. These you can find anywhere they sell picture frames just about, but I bought mine at Walmart.)
  • Craft knife OR sturdy scissors (with scissors, you'll need strong hands)
  • Metal straight edge/ruler
  • Spray mount Or Photo Mounting Squares (I get my photo mounts at Joann's or Micheal's in their scrap-booking section, but I'm sure Walmart or Target has these.)
  • Adhesive-backed magnet tape (A little more tricky to find, but I bought mine at Micheal's)
  • Photo editing software, such as Adobe Photoshop (Gimp a downloadable program or Pixlr, an online photo editing program would work as well)
  • Photo paper & Printer OR If you are like me, you'll just take them to the local photo lab printers.

How To:

1. You'll need to download the Photoshop file of the Polaroid frames below. One download is for a 4x6 image, handy for taking to the photo printer, and the other is an 8.5x11 that you can use at home. In your photo editing program, place your photographs in a separate layer behind the Polaroid frame layer. Crop and re-size your photos to fit within the mini Polaroid frames.

2. Print out photos onto photo paper. (Or pick them up from the photo lab place, lol. As a side note, I used matte paper for mine, but it works either way.)

My Path diverges here: Either you use A) spray mount adhesive or you use B) photo squares.

3A.Spray the back of your sheet of photos and also the cardboard/card stock with spray mount. Let each dry a minute before mounting the photos to the card stock. 

3B. Trim your photos. I trimmed my photos before I attached them to the card stock because it would be easier to see where to stick the photo mounts. Then attach the photos to the card stock leaving a little space between for easier trimming.

4. Trim around the photos with your craft knife or scissors.  Use the metal ruler/straight edge as a guide for your knife.

NOTE: Scissors can tend to pinch the card stock at the corners if you are not careful. See photo right. If you are using a craft knife, start with a fresh blade.

5. Attach magnets to back of each individual Polaroid. Depending on whether you bought a sheet or a roll of magnets will determine whether you should stick the Polaroids to the sheet first or time the roll to fit the Polaroids and then attach them.


Downloads:

4x6 Photoshop File

8.5x11 Photoshop File


Sunday, April 1, 2012

Picante Chicken and Rice Bake


Image courtesy of recipe.com
I got this recipe from my local newspaper, who it appears, VERY indirectly got it from either the Pace® website or the Campbell's® Kitchen website. Brian likes it so I'm saving it here for posterity.

Prep Time: 5 minutes
Bake Time: 45 minutes
Makes: 4 servings

Nutrition per serving:
Calories: 399
Carbs: 42g
Fat: 8g
Fiber: 4g
Protein: 30g
Sugar: 12g
Sodium: 1476mg

What you'll need:
1 jar (16 oz.) Picante sauce
1/2 cup water
1 cup whole kernel corn
3/4 cup uncooked regular long-grain white rice
4 skinless, boneless chicken breast halves (about 1 pound)
Paprika
1/2 cup shredded cheddar cheese


Preparation:

1. Stir Picante sauce, water, corn and rice in an 11 x 8 inch shallow baking dish.

2. Place chicken on top of rice mixture. Sprinkle the chicken with paprika, then cover the dish with aluminum foil.

3. Bake at 375°F for 45 minutes or until chicken is cooked through and rice is tender. Sprinkle with cheese.


Recipe Variation: Make the rice a little creamier and add 1 can (10 3/4 ounces) Condensed Cream of Chicken Soup and only use 1 cup of the Picante sauce.

Nutrition per serving Using Cream of Chicken Soup: Calories: 440, Fat: 13g, Fiber: 4g, Protein: 33g, Sodium: 1305mg

ShareThis