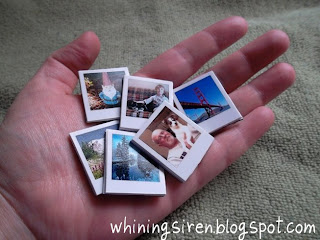
I stumbled on a cute little magnet project from the Ambrosia Creative website for custom Polaroid shaped magnets. I decided I wanted to make them for my best friend who lives a couple states away. But after seeing how cute they were, I decided I wanted a set for myself as well. Here is how mine turned out and how I did it.
Pinspiration: Tiny Polaroid Magnets
Some of the items are a little difficult to find on the Harbor so I also included where I found them below.
You will need:
- Stiff white card stock or photo matte board (I used the same board as is used to Matte a nice photo, because it had the right thickness I wanted. These you can find anywhere they sell picture frames just about, but I bought mine at Walmart.)
- Craft knife OR sturdy scissors (with scissors, you'll need strong hands)
- Metal straight edge/ruler
- Spray mount Or Photo Mounting Squares (I get my photo mounts at Joann's or Micheal's in their scrap-booking section, but I'm sure Walmart or Target has these.)
- Adhesive-backed magnet tape (A little more tricky to find, but I bought mine at Micheal's)
- Photo editing software, such as Adobe Photoshop (Gimp a downloadable program or Pixlr, an online photo editing program would work as well)
- Photo paper & Printer OR If you are like me, you'll just take them to the local photo lab printers.
How To:
1. You'll need to download the Photoshop file of the Polaroid frames below. One download is for a 4x6 image, handy for taking to the photo printer, and the other is an 8.5x11 that you can use at home. In your photo editing program, place your photographs in a separate layer behind the Polaroid frame layer. Crop and re-size your photos to fit within the mini Polaroid frames.
2. Print out photos onto photo paper. (Or pick them up from the photo lab place, lol. As a side note, I used matte paper for mine, but it works either way.)
My Path diverges here: Either you use A) spray mount adhesive or you use B) photo squares.
3A.Spray the back of your sheet of photos and also the cardboard/card stock with spray mount. Let each dry a minute before mounting the photos to the card stock.
3B. Trim your photos. I trimmed my photos before I attached them to the card stock because it would be easier to see where to stick the photo mounts. Then attach the photos to the card stock leaving a little space between for easier trimming.
4. Trim around the photos with your craft knife or scissors. Use the metal ruler/straight edge as a guide for your knife.
NOTE: Scissors can tend to pinch the card stock at the corners if you are not careful. See photo right. If you are using a craft knife, start with a fresh blade.
 5. Attach magnets to back of each individual Polaroid. Depending on whether you bought a sheet or a roll of magnets will determine whether you should stick the Polaroids to the sheet first or time the roll to fit the Polaroids and then attach them.
Downloads:
4x6 Photoshop File
8.5x11 Photoshop File


0 comments:
Post a Comment